
Tankless Water Heater Exhaust & Intake Vent Guide: Installation and Protection
Tankless Water Heater Exhaust & Intake Vent Guide: Installation and Protection
Installing a tankless water heater is not just about the unit itself—the intake and exhaust venting system is equally important. Without proper venting, your system may face issues like backdrafting, freezing, or blockages caused by leaves and rodents. In this guide, we’ll explain how tankless venting works, what materials are best, and how a durable stainless steel vent cap can keep your system safe for years.
Understanding Intake and Exhaust for Tankless Water Heaters
A tankless water heater requires two key vent pipes:
-
Intake Vent Pipe – Brings in fresh air for combustion.
-
Exhaust Vent Pipe – Expels gases and moisture outside.
These pipes often run side-by-side through a roof or exterior wall. Proper installation ensures:
-
Safe exhaust of combustion gases
-
Adequate oxygen supply to the heater
-
Prevention of moisture or backdraft problems
Why You Need a Roof Vent Cap for Tankless Exhaust
Without protection, vent pipes are exposed to:
-
Leaves and Debris – which can clog the exhaust system
-
Small Animals & Birds – that may enter the pipe
-
Snow and Ice – blocking airflow during winter
-
Water Backflow – rain entering the exhaust
This is where a stainless steel roof vent cap becomes essential.
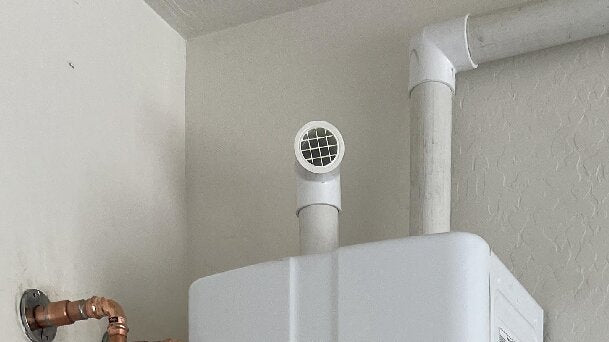
Recommended Vent Cap: Stainless Steel 2-Inch PVC Roof Termination
Our recommended solution is the LGQF-LL Stainless Steel Roof Vent Cap.
Product Features:
-
Size: Fits 2-inch Schedule 40 PVC pipes (perfect for tankless vent systems)
-
Material: Premium stainless steel, rust-proof and weather-resistant
-
Design: Built-in mesh screen prevents animals, leaves, and insects from entering
-
Function: Anti-backflow, anti-freeze, and allows proper airflow
-
Installation: Plug-and-play design – simply push onto the PVC elbow or pipe, no adapter required
🔗 Buy on Amazon
🔗 Buy Directly from LGQF-LL
Installation Guide: How to Add a Vent Cap
-
Locate the exhaust PVC pipe from your tankless water heater.
-
Clean the pipe opening to remove dirt or old sealant.
-
Align the stainless steel vent cap with the PVC pipe or elbow.
-
Push to fit – the cap is designed for a snug, adapter-free connection.
-
Check stability and ensure proper airflow.
No tools, glue, or adapters required – installation takes just minutes.
Stainless Steel vs Plastic Vent Caps
| Feature | Stainless Steel | Plastic |
|---|---|---|
| Durability | 10+ years | 3–5 years |
| Rust Resistance | Excellent | Poor |
| Freeze Protection | Yes | Limited |
| Animal/Debris Protection | Mesh screen included | Often missing |
| Installation | Plug-and-play | May require fittings |
Clearly, stainless steel caps are the superior choice for tankless water heater exhaust systems.
FAQ: Tankless Water Heater Vent Caps
Q1: Do I really need a vent cap?
Yes. Without it, your vent can get clogged by leaves, snow, or pests—causing system failure.
Q2: Will this cap reduce airflow?
No. The mesh screen allows full airflow while blocking debris and animals.
Q3: Is it durable in winter?
Yes. Made from stainless steel, it withstands freezing temperatures and prevents ice buildup.
Q4: How do I install it?
It’s plug-and-play—no special tools or adhesives required.
Final Thoughts
When installing or upgrading your tankless water heater exhaust system, don’t overlook the importance of a quality vent cap. A stainless steel PVC roof vent cap offers long-lasting protection, prevents costly clogs, and ensures your heater runs efficiently year-round.
✅ Upgrade your tankless venting system today: